- Active Topics
- Forums
- Create Topic
-


I haven't seen any decent ones today...
https://unbelievable-facts.com/2017/04/april-fools-day-pranks.html
 1
1
 1
1
In a few years it might all be wireless (at least for top end specs), so problem solved ")
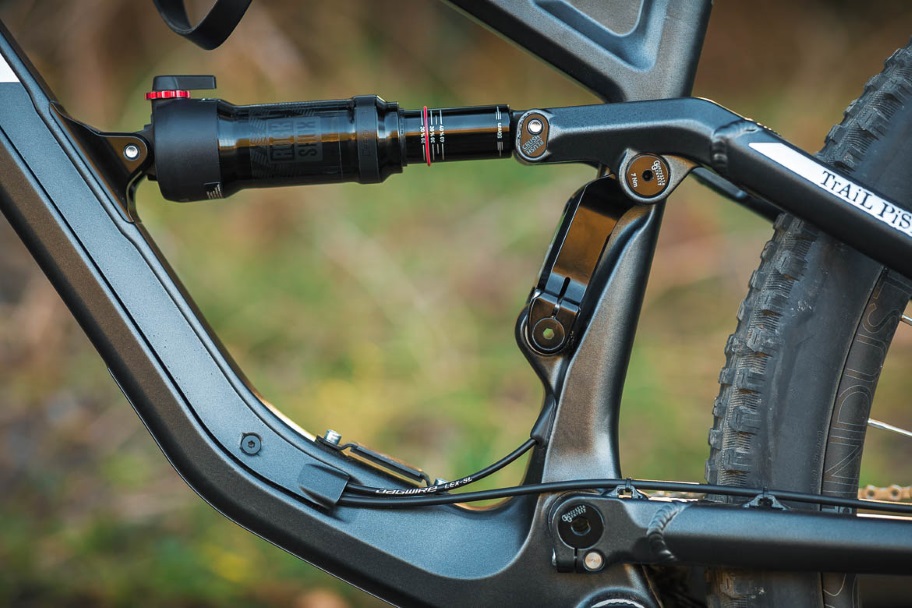
1 minute ago, MORNE said:Thats nice. I imagine that's a faceplate sitting in a channel in the frame? As in when removing you are not just looking at the i side of the downtube. Then on the back it, or in the channel you would have clips holding the hoses/cable housings in place. Thats how i would do it anyway. Best of both worlds.
Yes. Would probably be a little more difficult to do with an alu frame.

4 minutes ago, droo said:The second part of this trick is to put a bit of SRAM butter on the cable before you start.
But I agree, internal cable routing is a massive hack. You probably haven't even encountered the handlebar to stem to headset version yet, so the best is yet to come for you. New headset bearing? Cheers, you'll be replacing a brake hose and gear cables too.
But it looks cool, so it sells. Most people don't think of the increased cost of maintenance when looking at these things, so they just buy the one that looks best (all other things being equal-ish)
Which is why I like what GG did with their frames and routing. The only place I prefer internal is for dropper posts.
10 hours ago, RobertWhitehead said:Internal cable routing is one thing, but just imagine the disappointment when you see a frame with internal routing already fitted only to find out after shaking it that you're going to have to add some padding

I'm in the process of doing a 1x conversion and yanked out the front derailer cable along with its padding. Hopefully it won't result in rattles from the remaining cables.
Shimano chainring bolts use a T30 torx bolt and you need a decent amount of force to loosen them. Guessing it's the threadlock they used. You need strong properly fitting torx keys or you're likely to strip the torx keys and possibly damage the bolts.
Also not sure if the advice the LBS gave me about not needing spacers for the chainline is correct, but I'll see when I fit the cranks with the new chainring.
Some useful info on chainline and spacing: Understanding Chainline for Optimal 1X Conversions (Boost and Non-Boos (oneupcomponents.com)
1
 1
1
A possible explanation for the right vs left. Maybe someone applied degreaser on the chain / cassette and that worked its way past the seals and into the bearings. Or they just did more thorough washings for that side.
I've also had a left / right bearing go bad while the other one was fine. I don't recall which side, but might have been in the freehub.
Just now, BaGearA said:You very likely have a cane creek crown race which has a very high stack.
I think its just holding your bearing a fair way up and that's creating this kind of gap you see there.
It's a Suntour AION, not sure it would have a Cane Creek race, but maybe something similar. Thanks.
Saw this gap while washing my bike. I recently swapped handlebars and check headset bearings. I'm wondering if I put everything back together correctly. I should take more photos before taking things apart. I took one of the cable routing, but not of this part.
It feels fine, turns freely and there's no knocking. I've also seen photos online of other bikes with the same gap. I'm probably going to take it apart again just to be sure.

New colours listed on the website
Grey
Charcoal

Still no green 😛
I had too many annoying pinch flats with tubes to want to go back to using them. Had to run harder tyre pressures to avoid them. I didn't have a good experience with slime in tubes, didn't seal well for me and made patching difficult. Tubeless is a bit more expensive to maintain (sealant costs), but works better for me on the trails.
11 minutes ago, RobertWhitehead said:Now you mentioned this, what's the theory for cleaning the old sealant, I've always wondered
The other one had dried sealant in the shape of blisters which I didn't like.
Maybe a small effect on wheel balancing from slightly uneven distribution, not carrying the excess weight (which is minimal) and not mixing different sealant types, even though it's already dry. In all likelihood unnecessary to remove it and probably not things I'd notice while riding, just like you wouldn't notice a slight tyre wobble. The new sealant will probably re-create similar conditions. It's just nice to have them clean
On 1/12/2024 at 11:31 AM, ChrisF said:One for the books .....

Do a proper strip down and rebuild major service .... front tyre has an out of balance weight .... open and see a big ball of sealant.
Remove the tyre and pack out the high pressure jet.
Tyre over the chopping block and the sealant is removed easy enough. What the heck, remove the rear tyre and quickly clean it as well.
Step back and clean the area around the chopping block with the pressure hose.
Few bits of grass from the weed-eater stuck to the sliding door .... while I am at it might as well clean the sliding door..... and the window above it ..... and the gutter and facia above it ....
Ooo-damn .... cant have ONE clean gutter ..... next door, window, gutter and facia ....
Last section of gutters at the back ....
Same along the side of the house ....
Just one short gutter at the front, might as well wrap it up.
Damn .... the plaster band around the garage door is looking worse for wear .... actually looks very nice now, especially with the paving also cleared of a few bits of moss .....
Actually, few bits of paint came off .... so the plaster band will have to be repainted ....
And the plan was to just top up the sealant .....

En ek moet nog die fiets weer aanmekaar gaan sit ....
Guess I was 'lucky' that I could peel and rub this off. Takes a long time though, and sore fingers. Using a pressure sprayer might have been fun
Probably not necessary either, but I wanted a clean start with fresh sealant. I'll probably have to use a bit more to seal the sidewalls again.


Whey can cause acne flare ups. Haven't tried plant based.
Andretti denied entry to F1.
Tweaked my back this weekend. They say using a foam roller on sore muscles can help, however, this doesn't seem to be doing much for me.

3
Just now, droo said:Same same. And yes, Pedro's stuff is great. I have the last of the old stock in a box somewhere, I must actually catalogue and flog it.
Nice, let me know if you find it.
1 hour ago, droo said:Pedros tyre levers. Thank me later.
Also, possibly technique. Make sure the bead sits in the rim bed all the way round before you massage the last bit on.
Yeah, most likely technique  I can get the tyres on and off by hand without a tube in. I probably didn't have the tube in the best position when I tried to install it.
I have these Crowbar tyre levers which look like they're a copy of the Pedros ones. The tip is thicker than a normal lever, which can make it difficult in some situations, although it may be better for not damaging things.

I see there's a store that sells the Pedros levers locally. I wish they still sold other Pedros products here. I have some of their cleaning (degreasing) and Silicone Polish and they're excellent.
Guessing that sand blasting might be too aggressive for thin alu tubing. Probably Plascon paint stripper. Yes, it looks very nice
I wonder if there are issues with the sun reflecting into your eyes from the top tube? In which case you can probably paint a section a different less reflective colour.
I'm looking for the SRAM NX compatible ones. Not easy to find.


I have an idea for a new thread...
in Chit chat
Posted